Feeds:
Posts
Comments

ElectroServer 5.1 was released today with tons of updates that you can read about in the release notes. Aside from added examples and documentation, the biggest enhancements are noted below.

Bandwidth optimization
The bandwidth used for the most common message types was reduced significantly. It was already light weight but we were able to optimize it much further. In addition, messages can be set to automatically compress if over a certain size threshold.

Increased performance
We tuned the low-level messaging layer to achieve unprecedented performance. We’ve done testing to more than 100,000 messages per second with very low CPU impact (on EC2). This level of performance gives the server-side portion of your game plenty of room for its own logic to be executed.

JavaScript client API
A JavaScript client API was added to the arsenal. This is an important addition to the server to give it the broadest cross-platform reach of any multiplayer game server out there. ElectroServer has client APIs for ActionScript 2, ActionScript 3, Java, JavaScript, C#, and Objective-C. These APIs gives developers multiplayer support for Flash, AIR, Unity, .Net, XNA, iPhone/iPad, Android, native browser, and more.

New Game Examples
This release adds two new games to the examples list.

  • Zombie Race – A real-time multiplayer Flash game. From a top-down perspective, 2-4 players try to navigate their zombie through the maze to reach the brain first!
  • Iron Mongery – This is a single player puzzle game written with a Java client. Other players can chat with you and watch you play your game.

Download the latest server and exampleshere:
http://www.electrotank.com/resources/downloads.html

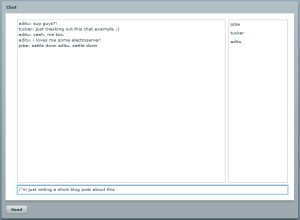
Creating a chat in Flash is easy using ElectroServer and MXML. If you are interested in creating multiplayer games, then first creating a simple chat application can help you learn the basic API calls used to communicate with ElectroServer. After building something like this you will have enough confidence to take the next step toward making a multilayer game!

At a high level you do the following to create a chat,

  • Download and install ElectroServer to get it running on your machine.
  • Create a new Flash project that uses the Flex Framework so that you can easily add UI components.
  • Add a few dozen lines of code to hook the ElectroServer API up to the UI.

This tutorial shows you how to create a chat step-by-step.

View the live chat example here.

ElectroServer 5 Released!

After many months of hard work by the team at Electrotank, I’m pleased to say that ElectroServer 5 (ES5) is out the door and ready to power tons of new multiplayer games and MMOs! It is available now for download and comes with a free 25 concurrent user license (with no other restrictions). In addition to the great new features with the 5.0 release, we have a ton of additional features that we’ll be adding and releasing over time.

ElectroServer 5 website

Press release

Here are some of the most notable new features.

Cross platform APIs

Over ElectroServer’s 8+ year life it has primarily been used for Flash applications. We’ve now introduced APIs across several languages keeping them as similar as possible. You can now have players play against each other across a multitude of platforms. The supported languages and platforms are,

  • AS2 and AS3 – Flash, AIR
  • C# – Unity3D, .Net, and XNA
  • Objective-C – iOS
  • Java – for any Java enabled client

UDP

For the fastest and most light weight message transfer, ElectroServer 5 provides the option for UDP messaging. UDP is needed for first-person shooters and racing games.

Message Encryption

ES5 supports strong packet encryption using the industry’s highest standard AES-128 method.

Message encryption is just one extremely effective means in which ES5 secures client-server communications. ES5 also supports cryptographically hashing passwords used to log onto the system.

Full-featured Sleek Admin

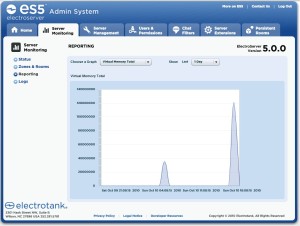
ElectroServer’s admin tool has been completely revamped to be more user-friendly (and attractive!). With it you can configure every aspect of the server. In addition, there are new reporting features built right in. You can view and configure graphs showing up-time, bandwidth usage, CPU usage, and more. There is also the ability to browse snapshots of the server to inspect which rooms exists and who is in them.

Extensive Documentation & Tons of Examples

We invested a lot of time in creating thorough documentation for every server feature. There are tutorials and more than 30 examples! ES5 also comes with a handful of complete multiplayer games.


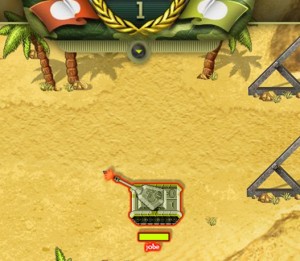
Screenshot of ES5 game example


Screenshot of Es5 game example


I hope to post more on ES5 and multiplayer game development in the near future.

You might want to read my first post on the Bresenham Line Algorithm.

The setup

I’m currently building a shooter game. There are lots of walls and at any time there may be lots of bullets. For the sake of simplicity, think of this game as 2D (with a top-down view). For collision detection purposes the walls have no thickness. The walls can be visualized as thin lines drawn anywhere at any angle. This does not restrict the position or movement of anything based on tiles.

Since there are bullets and walls I had to figure out the best approach for bullet-wall collision detection. The basic approach is easy to understand.

  • Imagine a line that a bullet would draw as it moves from one time step (or frame) to the next.
  • Take this line and do a line-to-line collision check against all of the walls.
  • Collect a list of all collision points that were found.
  • Do a distance check against the position of the bullet last time step (or frame) against the collision points found, and take the smallest distance as the true collision.

The above works great. However, the bigger the map and the more bullets on-screen the more time it takes to perform the collision detection. What I wanted to do was to find a way to run the collision check steps just described above, but instead of running it against all walls on the map, just run it against a small subset of the walls – the ones most likely to have been hit. Essentially, I wanted to find a way to cut down from what could be thousands of checks to a small handful of checks.

Initial attempt at culling

Imagine for a moment that there are tiles of an arbitrary size used to cover the entire map. Nothing is restricted by these tiles, and the user cannot see the tiles, they are just used as a convenience for us to cull walls. First we want to pre-process the map:

  • When the map initializes
    • Run a Bresenham line search against the grid with the two points that make up every wall.
    • For every tile that a wall touches, push a reference to that wall into an array stored in that tile.

Then for a specific bullet that is in motion:

  • Take the line that the bullet made between the last time step (or frame) and this one, and run a Bresenham line search against the grid.
  • Loop through every tile that is returned and check to see if any walls are referenced within it.
  • Use this collection of walls with the collision detection described at the top of this post.

The problem

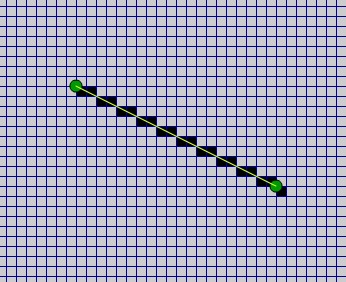
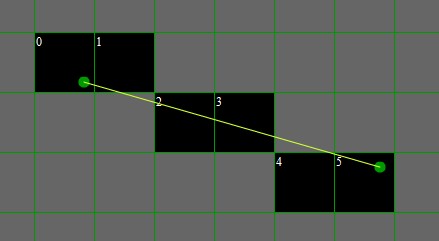
Bresenham’s line algorithm is intended to give a best approximation of which tiles a line drawn between the center of any two tiles touches. This presents a problem for us because the line a bullet makes can originate and end at any point within a tile. In the image below you can see that Bresenham’s line algorithm gives us most of the tiles that the bullet travels through, but not all of them.
The fix

To fix the above problem we just add to what the search does. Instead of doing the search one time, we do it 5 times. Assume that the line originates on tile (x1, y1) and ends on tile (x2, y2). We run this search against:

  • (x1, y1), (x2, y2)
  • (x1-1, y1), (x2-1, y2)
  • (x1+1, y1), (x2+1, y2)
  • (x1, y1-1), (x2, y2-1)
  • (x1, y1+1), (x2, y2+1)

Run all of the searches listed above and then filter the results by:

  • Removing any tile duplicates.
  • Removing any tile that lies beyond the bounding box made up of (x1, y1) , (x2,y2)

And then sort the results based on tiles that would be touched by the line moving from the originating tile to the destination tile (see source code for sorting logic). The end result is a list of tiles that could be touched by a line drawn from any point within the starting and ending tiles. In many cases you’ll have extra tiles that the line will not have passed through. That is fine. The benefits far outweigh the check against an excess tile.
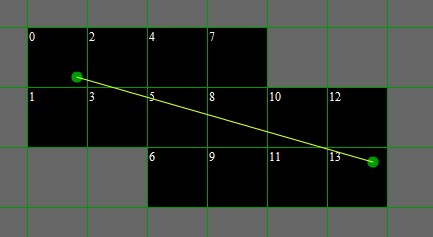
It seems like there is a lot going on to perform the search and sort the results. That is because there is. But the search is very fast. Only integers are used, no trig functions used, and there are no square roots. Running this search against a bullet that crosses a large map in a single frame is might take 2 milliseconds. And you are left with a small subset of all the walls in the map to run your collision math against.

There is another benefit here I didn’t mention yet, and you can see by the numbered tiles above. The tiles are returned in order of the possibility of them being touched by the line. That means that you can run the actual collision detection against the walls found within a tile as you loop through the tiles. If you find a collision within a tile – you can stop processing any more tiles. You still have to finish processing the current tile because there may be more than one wall in that tile, and the walls within the tile are unordered. So that is a nice advantage! If you have a line that crosses an entire map, it could still have dozens or hundreds of tiles returned. But you might only have to process a few of them.

Download source

Final notes – over-drawing

I just wanted to point out one final thing. As mentioned above, this approach can return more tiles that the line actually passes through. But it doesn’t always. Vertical lines and horizontal lines return the exact tiles touched, and 45 degree angles return the most excess.

Bresenham’s line algorithm is a fairly simple algorithm that takes two tile positions in a grid and returns a list of all tile positions that a line drawn between the two positions touches. It is well described along with easy-to-read pseudo code here.

When is this useful? According to what I’ve read, this algorithm and variations of it are useful in graphics programs. I’m sure you’ve seen programs that let you draw icons in a zoomed-in view. While you draw lines it just colors in boxes. It is likely this algorithm was used for that. However, I use this algorithm for game-related purposes. The last time I used it was probably 5 or 6 years ago in a Flash pool game. I set up a grid with an arbitrary tile size on the pool table (that the user can’t see). Every frame I determined in memory which tiles a ball covered as it moved (assuming no collisions). Then I would only run collision detection against balls that touched the same tiles. This let me cut down on the number of collision checks per frame.

I’m coming back to this algorithm again now because of a first person shooter game I’m working on. I hope to create a blog post on how the algorithm is used in that game (on the server) to keep the collision detection calculations to a minimum.

I created a Flash demo of Bresenham’s line algorithm that you can play with by clicking on the image. Or you can download the source files here.

click to view example (drag dots around)

This post is slightly related to my previous post, Referencing Classes Outside of Your Project in Visual Studio. What I describe here for Unity will also work for Visual Studio. I am very new to Unity development. By new, I mean that I’ve probably only invested about one day into it so far. That’s my disclaimer in case there is a vastly easier way to this.

Coming from a ActionScript/Flash background I’m used to being able to just add classpaths to a project that point to any arbitrary locations on my hard drive to reference code. My project code would generally be located right there with the project, but utility code that is used across many projects would be located in another location.

In Unity (as far as I can tell) the only classes that you can reference are those that exist within the [project]Assets/Scripts directory, or sub directory. I haven’t discovered anything that is similar to adding a classpath in Flash. Also, while Visual Studio let’s you add an existing item ‘as link’ (see this post) Unity doesn’t appear to have that feature.

So what is the solution? A solution in Windows Vista or Windows 7 is to use symbolic links to add the directories that contain the source files to your [project]Assets/Scripts directory. If you create a symbolic link to a directory then for all intents and purposes that directory is seen as existing in two places (obviously there really is only one version of it though).

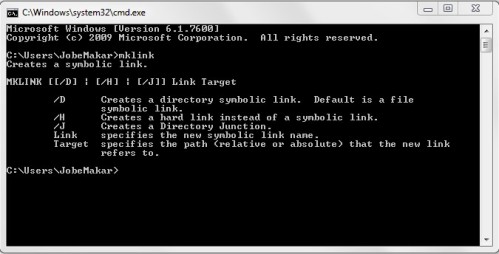
You can create a symbolic link in a directory by using the command prompt, navigating to that directory, and then running a ‘mklink’ command. If you just run ‘mklink’ by itself you’ll see the options:

The option you want to use is /D for creating a link to a directory. Here is an example usage:

‘my_new_dir_name’ is the name that will show up in the current location when this command is run. ‘path_to_real_dir’ is the absolute path to the real directory you are linking to.

That title is a mouthful, but I couldn’t think of how to else to phrase it. Coming from a pure Flash development background I’m new to C# and Visual Studio/Web Developer. And there was something about Visual Studio that was driving me nuts for the first few weeks. In Flash I’m used to being able to have a project which would contain source files and may reference SWCs (compiled code like DLLs). And I’m used to being to reference source code from anywhere on my computer that is outside of my project by simply adding that location as a classpath. This would allow me to work on my current project, but still suck in the source code to other APIs and utilities as a code so that I can work on them all at the same time.

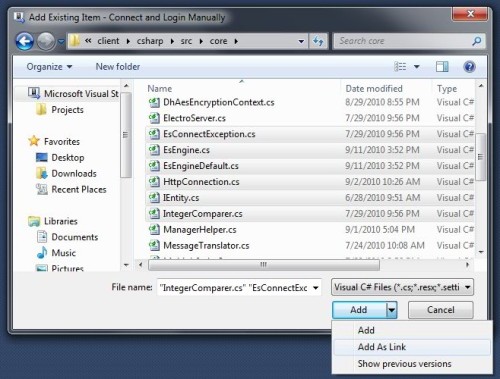
In Visual Studio I wasn’t able to figure out how to reference code that lives in some arbitrary location outside of my project. Doing this is actually pretty easy, but it was weeks before someone filled me in. Here is what you do (see images below also) :

  • Right-click on your project (or on a directory in your project) and choose Add > Existing Item
  • Then browse to find one or more source files, select them and….
  • In the bottom right-hand part of the dialog you’ll see an Add button, but it has a little drop-down next to it. Click that and choose Add as Link.

If you do the above you’ll be able to edit and reference the added code without the classes actually being copied into your application!

After attending FITC a couple of times now I’m really excited to not only attend, but to be a part of FITC San Fancisco! They’ve lined up an incredible group of speakers including Colin Moock, Yugo Nakamura, Jared Ficklin, Erik Natzke, Kyle Cooper, Jeremy Clark from WIRED Mag, Kevin Lynch, and Ben Fry.

My presentation is Latency Hiding in Multiplayer Games. Latency is something that cannot be avoided, and how you handle it as a developer is the difference between a fun and responsive user experience or a frustrating and jerky experience. I’ll discuss the issues that latency in multiplayer games brings up, and look at various ways to handle it. Bring your laptop since we’ll all be able to jump into a few different games and battle right in the session!

Early bird price for this event ends Friday July 2nd, so get your tickets NOW and use the code ‘electrotank’ for an extra 10% off!

Adobe invited me to participate in the prerelease programs for Flash CS5 and AIR for Android. I took some time and built a game for the iPhone called Fruit Smash Organic which is currently in the iTunes app store. While I love my iPhone, Apple sure does make you jump through some ridiculous hoops to get an app on it. Even if it is your own testing device! The biggest frustration I had was with just getting my game onto the device.


With the latest crApple news it was time to get my hands on an Android device. My Nexus One arrived yesterday (FedEx Saturday delivery FTW) about 4pm, and I had Fruit Smash Organic ported to the device and running beautifully by 7pm! That includes downloading and installing the SDKs, walking through a Hello World tutorial, charging the device for a little while, and making some minor code edits. Kudos to Adobe and Google for making the process easy instead of a nightmare.

Also, the game performance is great! It doesn’t even think about dropping below full frame rate, and easily out performs the same app running on the iPhone. I look forward to creating more games for Android using Flash!

Short 45 second video showing primary game play.

A slightly longer video showing primary game play and some secondary elements. And you can see the reflection of my and my flipcam 🙂

I recently spent a little time recreating some older spring physics code, in AS3. It is the sort of thing you’ve probably seen 100 times over the years, but working on stuff like this never gets old to me. I’m sure I’ll recode it again in a few years 🙂

In this post you’ll see a quick demo of the spring behavior, a link to the source, and a little bit of explanation of physics.

click to view example

A little explanation
Spring behavior can be coded by first understanding Hooke’s Law. Imagine that you had a spring and a mass attached to the end of that spring. Hooke’s Law specifies the force that the spring applies to the mass when displaced from it’s rest position.

F = -k*x

Where x is the amount of displacement from the rest position, k is the spring-specific constant (spring “tightness”), and F is the force exerted by the spring on the mass. The force tries to get the mass to return to the rest position, so it is in that direction.

In my code I use the Vector3D class to generalized the equation from just x to x and y. Also, I connect two equal masses with a spring rather than just having a spring with a single mass. Two masses and a single spring obey the same equation. It is just that the two masses have the force applied in opposite directions.

F = -k*displacement

Where displacement is the distance between the two masses minus their distance at rest. If F is applied to one of the masses, -F is applied to the other one. The minus sign can be manually applied to wrapped into the displacement if calculated relatively.

A single mass can be connected to N springs. To achieve the correct resultant behavior the forces acting on each mass need to be summed each iteration and then used to affect the velocity.

What is missing?
I am not properly letting the system lose energy. To properly lose energy the springs should apply a resistive force against the direction of movement of the mass in the amount b*velocity, where b is a spring-specific constant. Currently I’m just slowing all things down by a factor of ~.95 every iteration…sort of like if the whole system was in oil.

Also, I’m currently assuming all masses are equal. This could be easily enhanced to support varying masses.

What is it good for?
This type of behavior comes up from time to time in games. Off the top of my head I remember using this behavior to simulate how a car shakes due to breaking quickly (from side view). The game was Pimp My Ride: Crowd Magnet. I think I created a rectangle with 4 masses and 6 springs. The springs connected the perimeter and the two diagonals. I hid the visibility of this frame but had it move on screen along with the car. I used the two top nodes to tell how to move/rotate the frame of the car as it stopped.

There was also a non-game UI that I created years ago for a client similar to what you see at Visual Thesaurus. Nodes were connected via springs, but then the nodes themselves also had a gravitational pull toward each other and a slight magnetic repulsion. It creates an interesting interface!

You could use a spring system to mimic a blob or cell. Turn off the lines and nodes and fill it with a color and allow it to bounce off of things. Or make a chain/rope that your character can swing from. Uses for this pop up from time to time!